A major feature of OneDrive is the ability to share individual files, and even entire folders, with other people throughout the Vermont State Colleges. When sharing via OneDrive you can adjust a number of options, including who the files are shared with, whether they can edit the files or not, and even set expiration dates for access.
Contents
Getting started
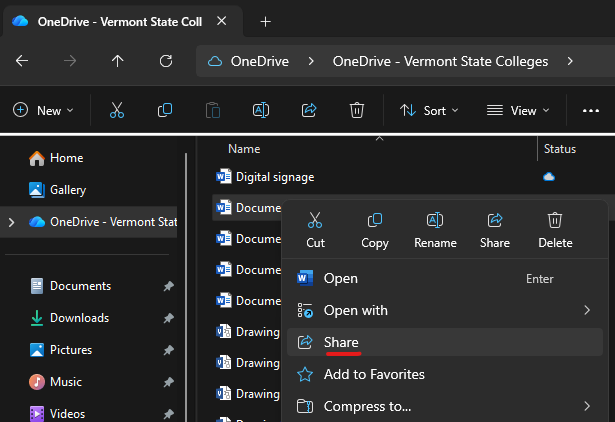
To begin, files must be stored in OneDrive. We’ll be using screenshots from a Windows 11 computer utilizing the native OneDrive App, but these steps can be replicated using the web version and when using Apple’s macOS. Start by locating the file you would like to share, right click on it, and choose Share from that menu:
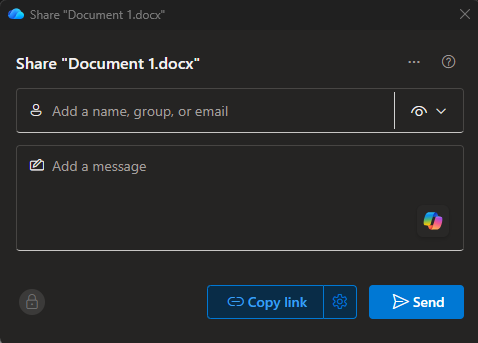
Once you click Share you will be shown a simplified sharing menu, prompting you for either the name or email address of the user you would like to share this content with. After choosing who you would like to share with click the Send button. This will send an email to the desired user with a link, and upon clicking that link they will open the shared document. You can also click “Copy Link”, then paste that link in an email for a more tailored message experience.
Important!
By default OneDrive links are Read Only and only shared with the people explicitly identified. In order for the document to be editable you must click the gear icon next to “Copy Link” to adjust advanced options.
Advanced sharing options
If you would like to adjust the level of access users have to your shared document start by clicking the gear icon next to “Copy Link”. Here you will be presented with three options, outlined below:
People in Vermont State Colleges: This link is accessible to anyone within the VSC. Be aware that users you have shared files with in this way can forward the link to others, potentially providing access to a wider audience than expected.
Only people with existing access: This will re-send a link to those who have already had access granted previously. This is most useful when adjusting the permission level on the link (for example, reducing access from “Can Edit” to “Can View”).
People you choose: This will generate a link that only the specific users can access. If they forward this link to others that you have not specified those users will not be able to access the documents.
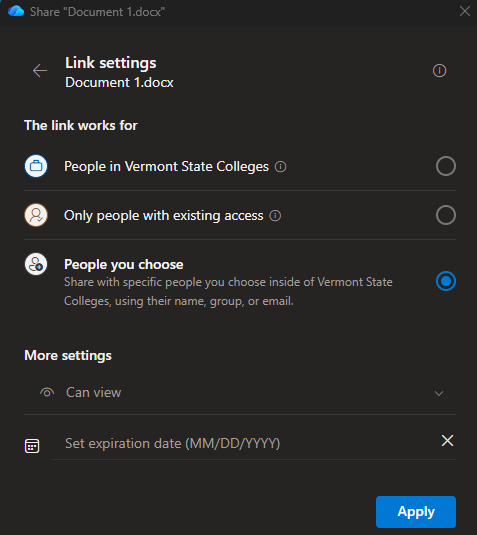
In this same menu you can also adjust the Permission Level and Expiration Date for access. The Permission Levels are outlined below:
Can Edit: Allows users to fully edit the document as if it was their own. This is the least secure and least restrictive setting, so take care when choosing this option.
Can Review: Allows users to add comments to a document, but not overwrite or directly change any content
Can View: Allows users to view the document, but not make any comments or changes. This is the default setting.
Can’t Download: The same permissions as “Can View”, with the additional restriction that the document cannot be downloaded or copied. This is the most secure and most restrictive setting.
Managing access
Once a document has been shared you will be able to adjust who has access to it and what permission level they have. To get started access the Share menu by right clicking on the document and choosing Share. You will find that the lower left corner will now include the profile pictures/user icons of those with access. Click those user icons to open the Manage Access menu:

From this menu you can adjust permissions for each individual, create additional links, or even stop sharing entirely. It is best practice to routinely verify that permissions are set properly and remove access that is no longer needed.
We would love to hear from you
As we continue to improve the VSC IT support site, we would love to get your feedback. Please sign-in to the feedback form linked below to share your thoughts.