On this page you’ll find definitions, how-to’s, and frequently asked questions (FAQ) about legal and chosen name changes, as well as adding pronouns.
Have a question that isn’t answered here, found an error, or need more guidance? Please reach out to Vermont State University Chief Diversity Officer, Paul Suk-Hyun Yoon (he/him) at paul.yoon@vermontstate.edu or Community College of Vermont Dean of People and Culture, Mary Brodsky (she/her) at mary.brodsky@ccv.edu.
Legal Name
Section Contents: Definition • How-To • Frequently Asked Questions (FAQ) • Other External Resources
Definition:
The Social Security Administration defines legal name as:
In general, a U.S. born person’s legal name is the name shown on [their] U.S. birth certificate (includes hyphens and apostrophes) unless the person’s name has changed based on certain events, such as a marriage or a valid court order for a name change.
A foreign-born person’s legal name is the name shown on [their] immigration document (includes hyphens and apostrophes).
How-To:
A legal name change in the Vermont State Colleges System (VSCS) requires:
Students (current and former) provide ONE of the following:
- Court Order (such as Probate Court or Divorce Decree)
- Passport (International Students must use this only)
- Driver’s License
- Social Security Card
- Marriage Certificate
Once you have a required document, contact the Registrar’s Office for the location you are, or were, a student for instructions on how to change your legal name:
- Vermont State University Registrar’s Office Email
- Community College of Vermont Legal Name Change Request Form
Employees (including student, work-study, and temporary employees) must provide:
- Social Security Card (your temporary card is acceptable)
Once you have a new social security card, submit an HR Benefits/UKG HelpDesk Ticket and the Employee Services team will assist you in changing your legal name for tax and employment purposes.
Frequently Asked Questions (FAQ):
Q: Where does my legal name appear?
A: Legal name appears on these records regardless of whether you have a chosen name:
- Official academic transcript
- Tax forms used in the course of student employment such as I-9, W-4, etc.
- Tax forms issued by the college such as W-2, 1098-T, 1095-C, etc.
- Any other place where we are compelled to do so by law
- Any checks issued to you by the VSCS
- Any financial aid documents and website because it may contain legal documents such as promissory notes
If you are a current student, faculty, or staff member and use a chosen first name that is different from your updated legal first name, the chosen name may display in place of your legal name until you change it. See the Chosen Name How-To for how to update your chosen name.
If we have something wrong or you need more guidance, please let us know so we can add or fix it: VTSU Assistant Director of DEISJ Outreach and Accountability, Aurora Hurd (they/them) at diversity@vermontstate.edu or CCV Dean of People and Culture, Mary Brodsky (she/her) at mary.brodsky@ccv.edu
Other External Resources
Info on Changing Your Gender Marker and/or Legal Name in Vermont from Pride Center of VT.
Name and Gender Marker Changes in Vermont information from Vermont Legal Aid & Legal Services Vermont.
Chosen Name/Name of Use
Section Contents: Definition • How-To • Frequently Asked Questions (FAQ)
Definition:
In Vermont State Colleges System (VSCS) chosen name is defined as:
Chosen name is a first name that may differ from the individual’s legal name. This may also be referred to as a nickname, preferred name, or name of use.
The VSCS Chosen Name Policy allows anyone in the VSCS to be identified by a chosen name and no documentation is required to make the change.
How-To:
Adding, changing, or deleting a chosen name in Self Service will automatically update your chosen name in many other VSCS systems that show a first name, including:
- Portal
- Canvas
- eRezLife
- Aviso
- Formstack
- Colleague
Systems not updated from Self-Service include:
- Zoom – (Note: if available, chosen name is automatically added when account is created)
- UKG
Self-Service Chosen Name Instructions
STEP 1: Login to the Portal (if you have not logged in recently, the VSC Authentication for Single Sign-On page will appear first and you login with your VSC Account, followed by an additional Duo authentication. If you have not set up Duo yet, follow the instructions to Enroll a New Device with Duo Multi-Factor Authentication first).


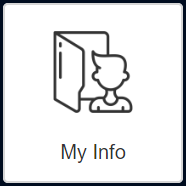
STEP 2: In the Portal, click the “My Info” button.
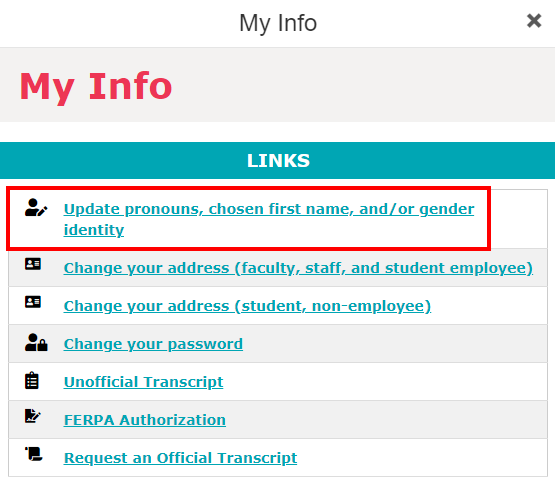
STEP 3: Click the link “Update pronouns, chosen first name, and/or gender identity” which will open your User Profile in Self Service.
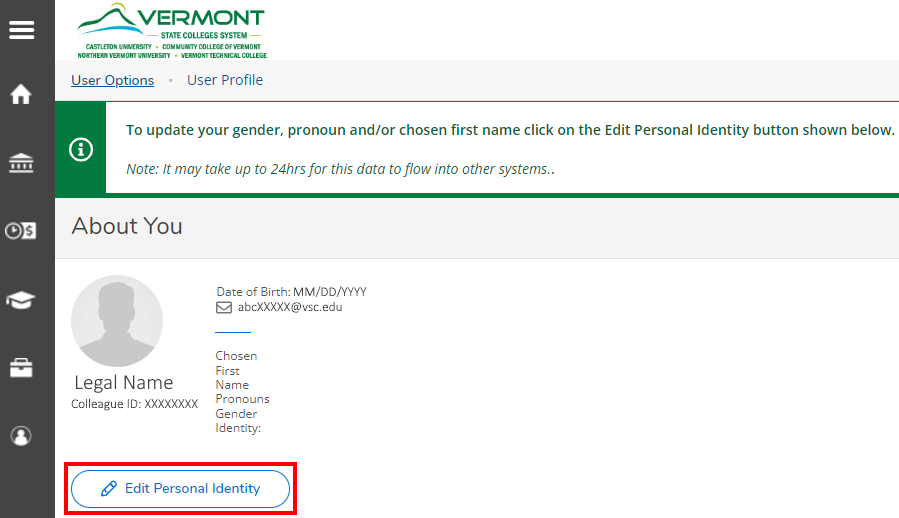
STEP 4: Click the “Edit Personal Identity” button
STEP 5: Add your chosen name into the “Chosen First Name” field and click the “Save” button.
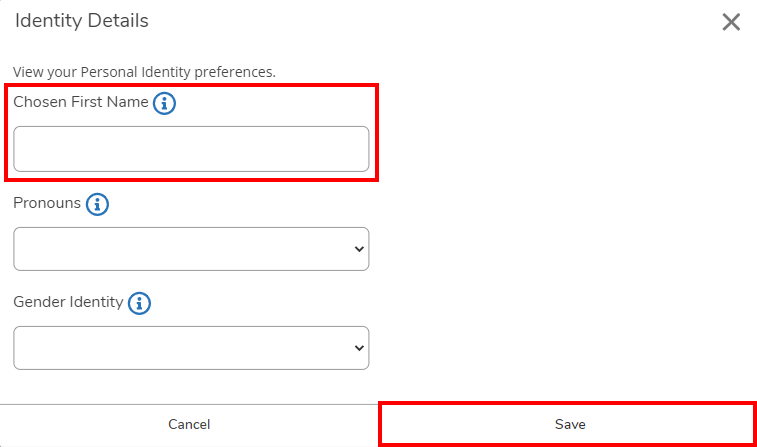
Your Chosen First Name will immediately appear in your User Profile, however, there is a delay of up to 24 hours for the name to be passed to other systems.
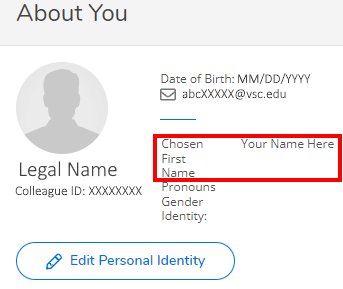
ALTERNATIVE STEP 1-3: If you prefer, you can skip the Portal and log in to Self Service directly to edit your User Profile. Click the Menu icon (three stacked horizontal lines) to open the menu, then click “User Options” and then “User Profile” to open the same page that the Portal link opens.

If you have trouble adding chosen name, please submit a ServiceDesk Ticket or Call to Get Help so the IT HelpDesk team can assist you.
Zoom Chosen Name Instructions
STEP 1: Open your Zoom Profile (if you have not logged in recently, the VSC Authentication for Single Sign-On page will appear first and you login with your VSC Account, followed by an additional Duo authentication. If you have not set up Duo yet, follow the instructions to Enroll a New Device with Duo Multi-Factor Authentication first).


STEP 2: In your Zoom Profile, click the “Edit” link
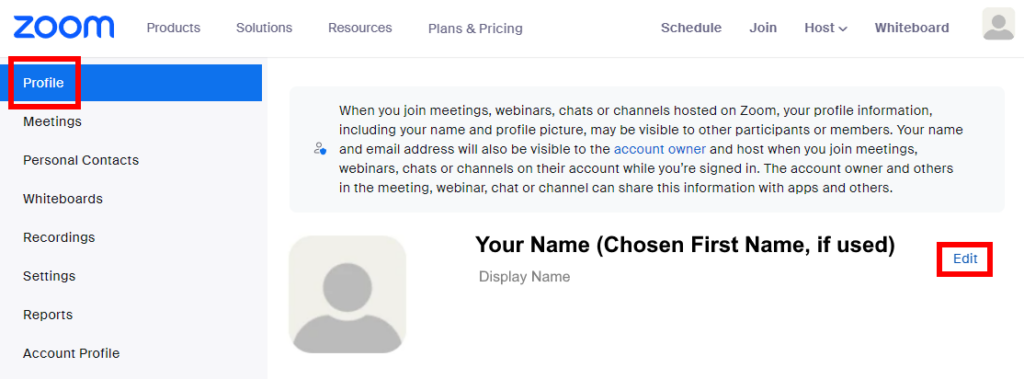
STEP 3: Replace the name in the “First Name” field with your chosen first name and change the first name in the “Display Name” field to match, if desired, then click the “Save” button.

Your Chosen First Name will immediately appear in your Zoom Profile and updated Display Name will show in meetings and webinars.

You can change your display name while in a meeting or webinar as well. This is a temporary change and will go back to the Display Name in your profile next time.
STEP 1: Right click with your mouse anywhere on your participant block and select “Rename” from the menu.
ALTERNATIVE STEP 1: Click Participants in the bottom menu (it may be hidden under “More” if you are using a small screen), then hover over your name in the list of participants and click the three dots (…), then select “Rename.”

STEP 2: Type the name you would like to display in the “Rename” pop-up screen and click “Change.”

Your changed name will immediately appear in the Zoom meeting participant block and list for this one meeting or webinar.
If you have trouble adding chosen name, please submit a ServiceDesk Ticket or Call to Get Help so the IT HelpDesk team can assist you.
UKG Chosen Name Instructions
STEP 1: Login to the Portal (if you have not logged in recently, the VSC Authentication for Single Sign-On page will appear first and you login with your VSC Account, followed by an additional Duo authentication. If you have not set up Duo yet, follow the instructions to Enroll a New Device with Duo Multi-Factor Authentication first).


STEP 2: In the Portal, click the “Employee Services” button.
STEP 3: Click the link “UKG (UltiPro)” which will open your Home Page in UKG. You may be asked to repeat STEP 1 if you have not logged into UKG recently.

ALTERNATIVE STEP 1-3: If you prefer, you can skip the Portal and log in to UKG directly to edit your User Profile.
STEP 4: Click the Person Icon in the left-side navigation to open the “Myself” menu, then select “Name, Address, and Telephone” from the “Personal” menu.

STEP 5: Click the “Edit” button.
ALTERNATIVE STEP 5: Click the “Change Name, Address, or Telephone” link under the “Things I Can Do” menu.

STEP 6: Type your chosen first name into the “Preferred First” field and click the “Save” button.

STEP 7: Click the “Submit” button on the Summary page.

Your changed name will immediately appear in your UKG profile.
If you have trouble adding chosen name, please submit an HR Benefits/UKG HelpDesk Ticket so the Employee Services team can assist you.
Frequently Asked Questions (FAQ):
Q: Can I select a chosen middle or last name?
A: No, your middle and last names will continue to be your legal middle and last names. Only a chosen first name may be requested.
Q: Where will my chosen name be used in place of my legal name?
A: Chosen name is used in most places we are not legally required to show legal name, assume that your chosen name will show unless you have confirmation that it won’t, some examples include:
- Mailings that go to a physical or email address that you share with your parents/guardians and other family members.
- Student Rosters in Canvas that are shared with faculty teaching your classes
- Student IDs can show chosen name
A: Legal name is the default in some cases and cannot be changed without going through the legal name change process, some examples include:
- Official academic transcript
- Tax forms used in the course of student employment such as I-9, W-4, etc.
- Tax forms issued by the college such as W-2, 1098-T, 1095-C, etc.
- Any other place where we are compelled to do so by law
- Any checks issued to you by the VSCS
- Any financial aid documents and website because it may contain legal documents such as promissory notes
Q: How do I get a student ID with my chosen name?
A: Use the following information for the location where you are currently a student for instructions on how to request an ID with your chosen name:
- Northern Vermont University ID Order Form (Lyndon, Johnson, and associated locations)
- NVU IDs are printed with the name provided on the linked order form. If you request a new ID because your name has changed, you will not be charged a fee for reprint as long as you turn in the old card. Contact information is included in the form if you have questions.
- Vermont Technical College Public Safety ID Request Email (Randolph and nursing sites)
- Castleton University Office of Public Safety (Castleton, Killington, and associated locations)
- CU IDs can be reprinted with your chosen name free of charge during office hours once a chosen name is added in Self Service. Call (802) 468-1399 with any questions you may have.
- Community College of Vermont Student ID Card Request Form (Montpelier, Winooski, and associated locations)
- CCV ID Requests are allowed at the beginning of each semester and will print with the chosen name you entered in Self-Service. If you request a new ID because your name has changed, or was printed incorrectly, please email Angie Albeck regarding the fees at angela.albeck@ccv.edu
If you don’t see an example listed that applies to you, we have something wrong, or you need more guidance please let us know so we can add or fix it: VTSU Assistant Director of DEISJ Outreach and Accountability, Aurora Hurd (they/them) at diversity@vermontstate.edu or CCV Dean of People and Culture, Mary Brodsky (she/her) at mary.brodsky@ccv.edu
Pronouns
Section Contents: Definition • How-To • Frequently Asked Questions (FAQ)
Definition:
The Vermont State Colleges System (VSCS) defines pronouns as:
A pronoun is a word that is used instead of a person’s name. At the VSCS, we encourage students, faculty, and staff to use the pronouns they are comfortable with.
You can add pronouns to many of our educational systems and no additional documentation is required. You can choose from four options: He/Him, She/Her, They/Them, or Name/Other.
How-To:
Adding, changing, or deleting pronouns in Self Service will automatically update your pronouns in some other VSCS systems that show pronouns, including:
- Portal
- eRezLife
- Colleague
Systems not updated from Self-Service include:
- Canvas
- Microsoft 365
- UKG
- Zoom
Microsoft 365 Pronoun Instructions
Pronouns are not automatically added to anyone’s Microsoft 365 profile, but anyone with a VSC email can add a pronoun to their account by following the instructions below. Everyone is welcome to reference this Microsoft support article for additional information outlining this feature.
Step 1: Log in to your VSC email using your current VSC username and password or open the Teams application where you area already signed in.
Step 2: Select your profile picture, or initials, at the top right of the screen

Step 3: Select “+Pronoun” under your name
Step 4: Add your pronouns in the text field
Self-Service Pronoun Instructions
STEP 1: Login to the Portal (if you have not logged in recently, the VSC Authentication for Single Sign-On page will appear first and you login with your VSC Account, followed by an additional Duo authentication. If you have not set up Duo yet, follow the instructions to Enroll a New Device with Duo Multi-Factor Authentication first).


STEP 2: In the Portal, click the “My Info” button.
STEP 3: Click the link “Update pronouns, chosen first name, and/or gender identity” which will open your User Profile in Self Service.
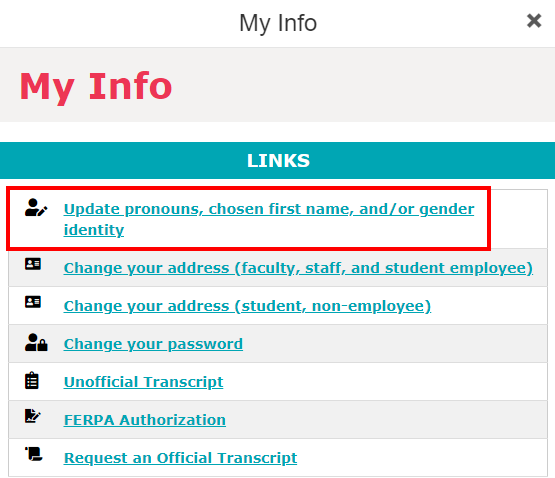
STEP 4: Click the “Edit Personal Identity” button.
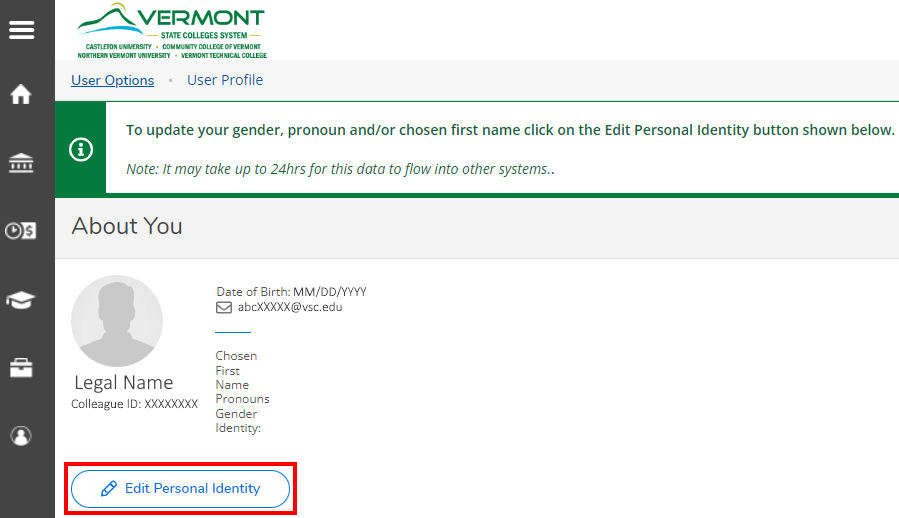
STEP 5: Select your pronouns in the “Pronouns” field and click the “Save” button.
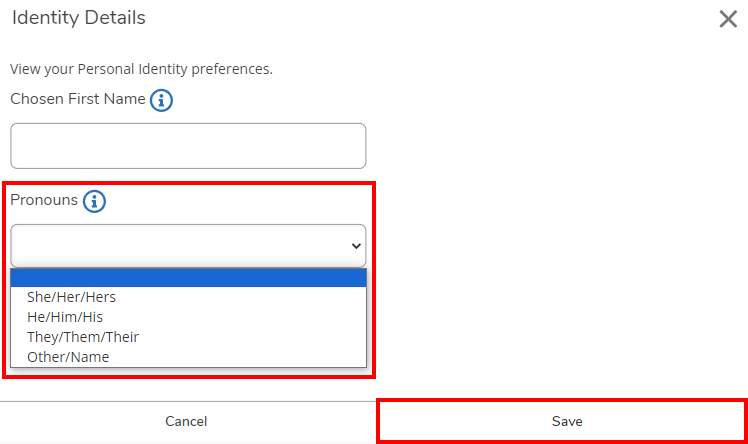
Your Pronouns will immediately appear in your User Profile.
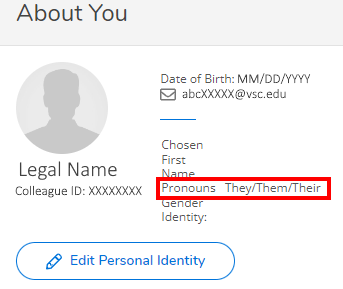
ALTERNATIVE STEPS 1-3: If you prefer, you can skip the Portal and log in to Self Service directly to edit your User Profile. Click the Menu icon (three stacked horizontal lines) to open the menu, then click “User Options” and then “User Profile” to open the same page that the Portal link opens.

If you have trouble adding pronouns, please submit a ServiceDesk Ticket or Call to Get Help so the IT HelpDesk team can assist you.
Zoom Pronoun Instructions
STEP 1: Open your Zoom Profile (if you have not logged in recently, the VSC Authentication for Single Sign-On page will appear first and you login with your VSC Account, followed by an additional Duo authentication. If you have not set up Duo yet, follow the instructions to Enroll a New Device with Duo Multi-Factor Authentication first).


STEP 2: In your Zoom Profile, click the “Edit” link.

STEP 3: Add your pronouns in the “Pronouns” field and choose from the “How would you like to share your pronouns?” field to “Always share,” “Ask me every time,” or “Do not share” in meeting and webinars, then click the “Save” button.

Your Pronouns will immediately appear in your Zoom Profile and display in meetings and webinars as you selected.


You can choose to unshare your pronouns while in a meeting or webinar as well. This is a temporary change and will go back to the showing the pronouns in your profile next time.

STEP 1: Right click with your mouse anywhere on your participant block and select “Unshare My Pronouns” from the menu.
ALTERNATIVE STEP 1: Click Participants in the bottom menu (it may be hidden under “More” if you are using a small screen), then hover over your name in the list of participants and click the three dots (…), then select “Unshare My Pronouns.”

Your pronouns will immediately disappear in the Zoom meeting participant block and list for this one meeting or webinar. If you want to reshare your pronouns later in the meeting, follow the same steps as above, but now the menu will say “Share My Pronouns.”
If you have trouble adding pronouns, please submit a ServiceDesk Ticket or Call to Get Help so the IT HelpDesk team can assist you.
Canvas Pronoun Instructions
STEP 1: Login to Canvas (if you have not logged in recently, the VSC Authentication for Single Sign-On page will appear first and you login with your VSC Account, followed by an additional Duo authentication. If you have not set up Duo yet, follow the instructions to Enroll a New Device with Duo Multi-Factor Authentication first).


STEP 2: On your Canvas Dashboard, click on “Account” in the menu.

STEP 3: Click the link for “Settings” in your “Account” menu.

STEP 4: Click the “Edit Settings” button.
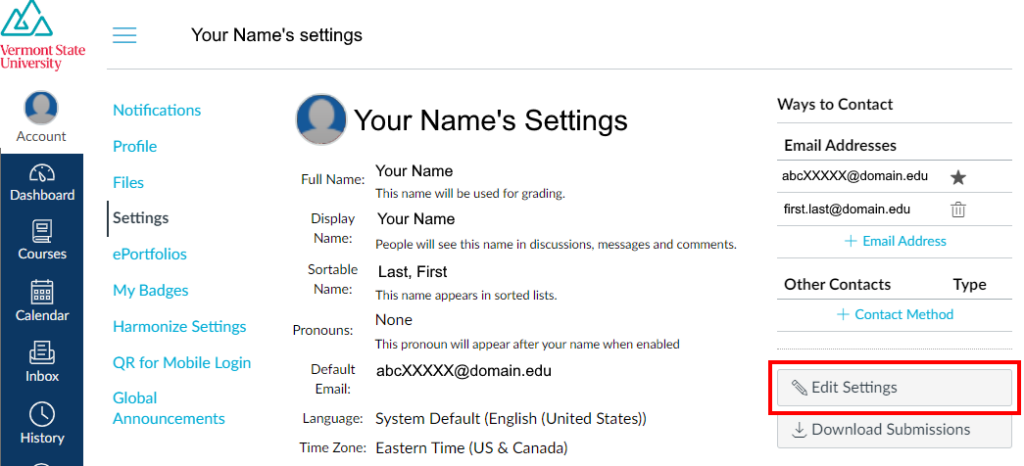
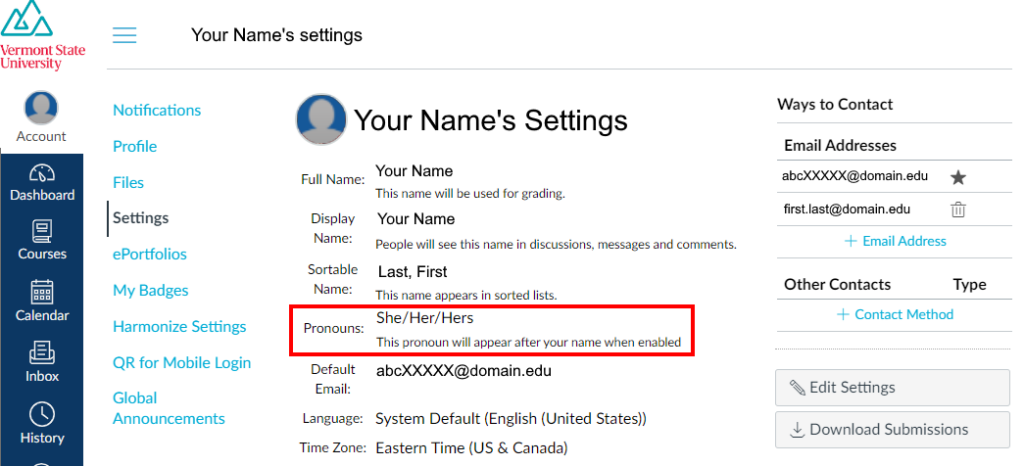
STEP 5: Select your pronouns in the “Pronouns” field and click the “Update Settings” button.

Your Pronouns will immediately appear in your Canvas Account and display after your name everywhere your name is shown.
If you have trouble adding pronouns, please submit a ServiceDesk Ticket or Call to Get Help so the IT HelpDesk team can assist you.
UKG Pronoun Instructions
STEP 1: Login to the Portal (if you have not logged in recently, the VSC Authentication for Single Sign-On page will appear first and you login with your VSC Account, followed by an additional Duo authentication. If you have not set up Duo yet, follow the instructions to Enroll a New Device with Duo Multi-Factor Authentication first).


STEP 2: In the Portal, click the “Employee Services” button.
STEP 3: Click the link “UKG (UltiPro)” which will open your Home Page in UKG. You may be asked to repeat STEP 1 if you have not logged into UKG recently.

ALTERNATIVE STEP 1-3: If you prefer, you can skip the Portal and log in to UKG directly to edit your User Profile.
STEP 4: Click the Person Icon in the left-side navigation to open the “Myself” menu, then select “Private Info” from the “Personal” menu.

STEP 5: Click the “Edit” button.
ALTERNATIVE STEP 5: Click the “Change Private Information” link under the “Things I Can Do” menu.

STEP 6: Select your pronouns in the “Preferred Pronoun” field and click the “Save” button.

Your pronouns will immediately appear in your UKG profile.

If you have trouble adding pronouns, please submit an HR Benefits/UKG HelpDesk Ticket so the Employee Services team can assist you.
Frequently Asked Questions (FAQ):
Q: What should I do if a professor or staff person isn’t respecting my pronouns?
A: Title IX is a Federal civil rights law that prohibits discrimination on the basis of sex in education programs and activities, including at the Vermont State Colleges System. Someone repeatedly or intentionally not respecting pronouns or gender identity may be considered to have violated Title IX.
For VTSU Students and Employees
Please reach out to VTSU Title IX and Protected Rights Coordinator, Amanda Hanincik (she/her), by email at TitleIXCoordinator@vermontstate.edu, or phone at 802.728.1103.
For CCV Students and Employees
Please use the Discrimination, Harassment, or Sexual Misconduct Incident Report form to submit a Title IX Concern to CCV Title IX Officer, Angie Albeck, or reach out directly by email at angela.albeck@ccv.edu or phone (802) 654-0690.
If we have something wrong or you need more guidance, please let us know so we can add or fix it: VTSU Chief Diversity Officer, Paul Suk-Hyun Yoon (he/him), at diversity@vermontstate.edu or CCV Dean of People and Culture, Mary Brodsky (she/her) at mary.brodsky@ccv.edu
Gender Identity
Section Contents: Definition • How-To • Frequently Asked Questions (FAQ)
Definition:
The Pride Center of Vermont defines gender identity as:
A person’s sense of who they are in relation to gender; gender identity may or may not be aligned with a person’s sex assigned at birth. Gender identity focuses on how a person identifies themselves, not on how others may perceive them.
You can add gender identity to many of our educational systems and no additional documentation is required. You can choose from four options: Nonbinary, Woman, Man, or Other.
How-To:
Adding, changing, or deleting gender identity in Self Service will automatically update your gender identity in some other VSCS systems that show gender identity, including:
- Portal
- eRezLife
- Colleague
Self Service Gender Identity Instructions
STEP 1: Login to the Portal (if you have not logged in recently, the VSC Authentication for Single Sign-On page will appear first and you login with your VSC Account, followed by an additional Duo authentication. If you have not set up Duo yet, follow the instructions to Enroll a New Device with Duo Multi-Factor Authentication first).


STEP 2: In the Portal, click the “My Info” button.

STEP 3: Click the link “Update pronouns, chosen first name, and/or gender identity” which will open your User Profile in Self Service.

STEP 4: Click the “Edit Personal Identity” button

STEP 5: Add your chosen name into the “Gender Identity” field and click the “Save” button.
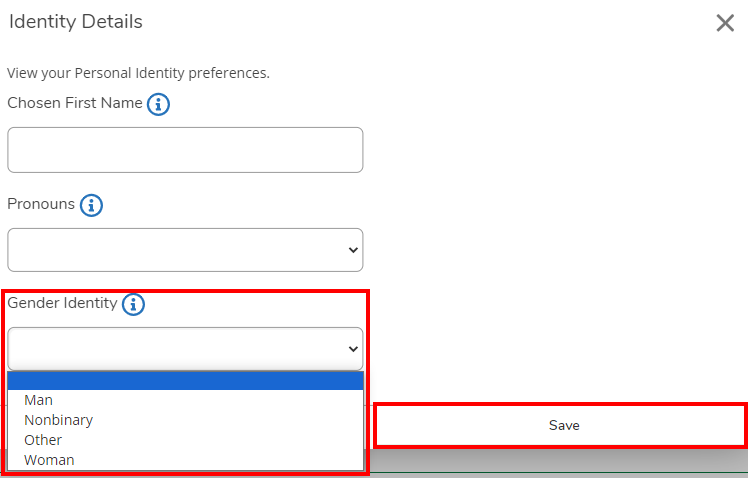
Your Gender Identity will immediately appear in your User Profile, however, there is a delay of up to 24 hours for it to be passed to other systems.
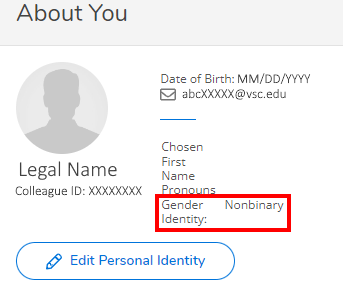
ALTERNATIVE STEP 1-3: If you prefer, you can skip the Portal and log in to Self Service directly to edit your User Profile. Click the Menu icon (three stacked horizontal lines) to open the menu, then click “User Options” and then “User Profile” to open the same page that the Portal link opens.

If you have trouble adding gender identity, please submit a ServiceDesk Ticket or Call to Get Help so the IT HelpDesk team can assist you.
Frequently Asked Questions (FAQ):
Q: What should I do if a professor or staff person isn’t respecting my gender identity?
A: Title IX is a Federal civil rights law that prohibits discrimination on the basis of sex in education programs and activities, including at the Vermont State Colleges System. Someone repeatedly or intentionally not respecting pronouns or gender identity may be considered to have violated Title IX.
For VTSU Students and Employees
Please reach out to VTSU Title IX and Protected Rights Coordinator, Amanda Hanincik (she/her), by email at TitleIXCoordinator@vermontstate.edu, or phone at (802) 728-1103.
For CCV Students and Employees
Please use the Discrimination, Harassment, or Sexual Misconduct Incident Report form to submit a Title IX Concern to CCV Title IX Officer, Angie Albeck, or reach out directly by email at angela.albeck@ccv.edu or phone (802) 654-0690.
If we have something wrong or you need more guidance, please let us know so we can add or fix it: VTSU Chief Diversity Officer, Paul Suk-Hyun Yoon (he/him), at diversity@vermontstate.edu or CCV Dean of People and Culture, Mary Brodsky (she/her) at mary.brodsky@ccv.edu
Page Last Updated October 31, 2024